
If you’ve used Windows 10, you’re probably familiar with system restore points. It’s a function that lets you return to a previous working state. The most recent version of Windows, Windows 11, allows you to create system restore points in a few simple steps.
The restore point is useful since it allows you to recover data from a variety of issues. You may rapidly restore Windows to a prior version using restore points. If you want to learn how to make a restore point in Windows 10, you’ve come to the correct place.
Steps to Create a Restore Point in Windows 11
Under this post, we’ll go over how to create a restore point in the Windows 11 operating system in detail. Follow some of the simple procedures outlined below to make the process run smoothly.
1. To begin, hit the Windows Key + R keys on your keyboard. The Run dialogue box will appear.
2. Type sysdm.cpl into the RUN dialogue box and press Enter.

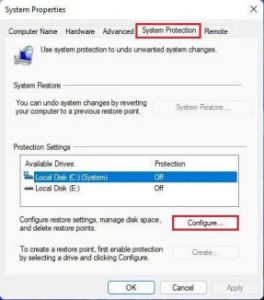
3. The System Properties page will appear. On the list, select the System Protection tab.
4. As indicated in the screenshot, choose the drive and click the Configure button.
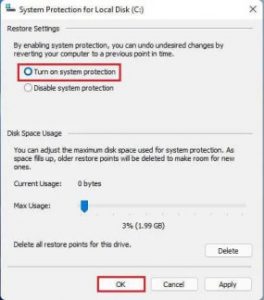
5. Select the Turn on system protection option in the following pop-up and click the ‘Ok‘ button.
6. Click the Create button to create a restore point.

7. You will now be prompted to write a description in order to identify the restore point. Create the restore point by giving it a name and clicking the Create button.

8. Wait until Windows 11 produces a restore point before proceeding. You will receive a success message once the account has been established.

That concludes our discussion. You’ve completed your task. On Windows 11, this is how you make a restore point.
So, this guide will show you how to establish a restore point on Windows 11. I hope you found this material useful! Please pass it on to your friends as well. If you have any questions, please leave them in the comments section below.


